
Before a while I discovered the website crawling framework Scrapy as mentioned in my earlier post Nice Python website crawler framework.
Now I wrote a little website crawler using this genius framework. Here are the steps I’ve taken to get my blog https://www.ask-sheldon.com crawled:
Installation of Scrapy
- Install Python package management system (pip):
$> sudo apt-get install python-pip
- Install required networking engine twisted and other dependencies:
$> sudo apt-get install python-twisted
$> sudo apt-get install libxml2-dev
$> sudo apt-get install libxslt1-dev
$> sudo apt-get install python-dev
- Install scrapy via Python’s package manager pip:
$> sudo pip install scrapy
On Ubuntu you can install Scrapy by just follow the instructions in the manual (http://doc.scrapy.org/en/latest/topics/ubuntu.html#topics-ubuntu).
Try out Scrapy for the first time:
- Generate new Scrapy project:
$> scrapy startproject Crawler
- Generate new Scrapy spider module (named sheldon):
$> scrapy genspider sheldon ask-sheldon.com
This creates a complete modules structure like this:
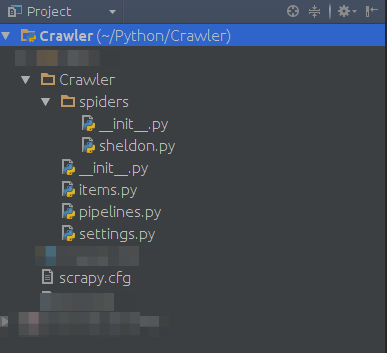
- Now you can run a simple testrun:
$> scrapy crawl sheldon
This creates an output like this:
2015-08-05 19:45:46 [scrapy] INFO: Scrapy 1.0.1 started (bot: Crawler)
2015-08-05 19:45:46 [scrapy] INFO: Optional features available: ssl, http11
2015-08-05 19:45:46 [scrapy] INFO: Overridden settings: {'NEWSPIDER_MODULE': 'Crawler.spiders', 'SPIDER_MODULES': ['Crawler.spiders'], 'BOT_NAME': 'Crawler'}
2015-08-05 19:45:46 [scrapy] INFO: Enabled extensions: CloseSpider, TelnetConsole, LogStats, CoreStats, SpiderState
2015-08-05 19:45:46 [scrapy] INFO: Enabled downloader middlewares: HttpAuthMiddleware, DownloadTimeoutMiddleware, UserAgentMiddleware, RetryMiddleware, DefaultHeadersMiddleware, MetaRefreshMiddleware, HttpCompressionMiddleware, RedirectMiddleware, CookiesMiddleware, ChunkedTransferMiddleware, DownloaderStats
2015-08-05 19:45:46 [scrapy] INFO: Enabled spider middlewares: HttpErrorMiddleware, OffsiteMiddleware, RefererMiddleware, UrlLengthMiddleware, DepthMiddleware
2015-08-05 19:45:46 [scrapy] INFO: Enabled item pipelines:
2015-08-05 19:45:46 [scrapy] INFO: Spider opened
2015-08-05 19:45:46 [scrapy] INFO: Crawled 0 pages (at 0 pages/min), scraped 0 items (at 0 items/min)
2015-08-05 19:45:46 [scrapy] DEBUG: Telnet console listening on 127.0.0.1:6023
2015-08-05 19:45:48 [scrapy] DEBUG: Crawled (200) <GET https://www.ask-sheldon.com/> (referer: None)
2015-08-05 19:45:48 [scrapy] INFO: Closing spider (finished)
2015-08-05 19:45:48 [scrapy] INFO: Dumping Scrapy stats:
{'downloader/request_bytes': 217,
 'downloader/request_count': 1,
 'downloader/request_method_count/GET': 1,
 'downloader/response_bytes': 53830,
 'downloader/response_count': 1,
 'downloader/response_status_count/200': 1,
 'finish_reason': 'finished',
 'finish_time': datetime.datetime(2015, 8, 5, 17, 45, 48, 888643),
 'log_count/DEBUG': 2,
 'log_count/INFO': 7,
 'response_received_count': 1,
 'scheduler/dequeued': 1,
 'scheduler/dequeued/memory': 1,
 'scheduler/enqueued': 1,
 'scheduler/enqueued/memory': 1,
 'start_time': datetime.datetime(2015, 8, 5, 17, 45, 46, 682463)}
2015-08-05 19:45:48 [scrapy] INFO: Spider closed (finished)
As you can see, the crawler only crawled one single URL:
2015-08-05 19:45:48 [scrapy] DEBUG: Crawled (200) <GET https://www.ask-sheldon.com/> (referer: None)
That’s because this was only the generated test dummy with no useful configuration.
Build up an own website spider based on the Scrapy Framework
After this initial experiment I decided to implement my own Scrapy based page crawler to initialize (warm) the fullpagecache of this blog (WordPress’s WP-Supercache). The spider should have had the following features:
- The spider crawls all links of a given domain recursively. So all domain pages will be loaded ones and the page cache for these pages is warmed.
- All links that should be called can be specified via simple CSS selectors. Only matching links will be processed.
- Everything can be configured in a single configuration file.
- All application logs are written into a log-file in a separate folder (one per day, logs folder)
- The crawled URLs, page-titles, headers and statuses are exported to a CSV file (per day, export folder)
You can download the Crawler from my GitHub project page on https://github.com/Bravehartk2/ScrapyCrawler.
Steps taken
These things I changed on the generated code to get my blog crawled:
- To anonymize my spider I renamed spiders/sheldon.py to spiders/cachewarmer.py
- Implemented a CrawlSpider (SheldonSpider) that uses LinkExtractor-based Rules to extract all relevant links from my blog pages based on diverse settings (in cachewarmer.py)
- Outsource all settings from the Crawler to the settings file (settings_sheldon.py). For example:
- Crawler.settings.CRAWLER_DOMAINS => domains to accept / analyse
- Crawler.settings.CSS_SELECTORS => CSS selectors to address the links to crawl
- …
- Implement a filter_links function to ignore all links that have the nofollow attribute set
- function is called for every link found on a page to decide to follow it (append to crawleable link list) or not
- logs droped links
- Implement a scrapy.Item based item class (PageCrawlerItem in Crawler/items.py) that can store meta data from the crawled pages
- HTTP-status
- page title
- page url
- HTTP response headers
- The fields are set in the function parse_item of the SheldonSpider. The function is used by Scrapy to write the crawling results to a feed (CSV, XML, JSON => see feedexports in the Scrapy documentation)
- Activated the CSV export in the settings (settings_sheldon.py):
dateTimeString = datetime.datetime.now().strftime("%Y%m%d") ... # Feed export FEED_FORMAT = 'csv' # exports to csv FEED_EXPORT_FIELDS = ['status', 'title', 'url', 'headers'] # which fields should be exported FEED_URI = "export/www.ask-sheldon.com_%s.csv" % dateTimeString # WHERE to store the export file - Activated file based logging in the settings (settings_sheldon.py):
dateTimeString = datetime.datetime.now().strftime("%Y%m%d") ... # Logging and stats DEPTH_STATS_VERBOSE = True LOG_FILE = "logs/www.ask-sheldon.com_%s.log" % dateTimeString - The other settings are mostly standard configuration fields
- Symlinked settings_sheldon.py (settings.py)
How to run it
To get the crawler running you have to take the following steps:
- Install Scrapy
- Clone the repository (or just download it via GitHub)
- Set a symlink to a project specific settings file (in the Crawler folder)
- Copy settings from settings_sheldon.py and adapt them for your needs (CRAWLER_NAME, CRAWLER_DOMAINS, CRAWLER_START_URLS, CSS_SELECTORS etc.)
- Now you can run the crawler from the project folder by using the following command:
$> scrapy crawl CRAWLER_NAME_FROM_SETTINGS_PY
- That’s it! The crawler will now crawl everything you’ve configured
- You can following the process by:
$> tail -f logs/whateveryouveconfiguredinsettingspy.log
- Crawled meta data (status, title, url and headers) is stored in export/whateveryouveconfiguredinsettingspy.csv
More information about Scrapy
For more information about the used Python library Scrapy you should have a look at the following resources: